
One of the first things we take into consideration before starting to crochet any item is how it will be constructed. And there are two ways of doing this: back and forth or in the round (or a combination of both). Crocheting in the round gives us the chance to avoid some seams and save some time and/or material for finishing any garment. It is also a great way for molding work because it lets us see sizes and shapes more immediately as we go crocheting.
Many of my crochet patterns are worked in the round in a spiral way with single crochet. This tutorial will be about the basics of this kind of construction. And I will also be giving some essentials for working in the round in closed rows with taller stitches like half triple crochet (UK double crochet) and double crochet (UK triple crochet).
There are several ways to start.
It all depends on what you want your finished piece to be.
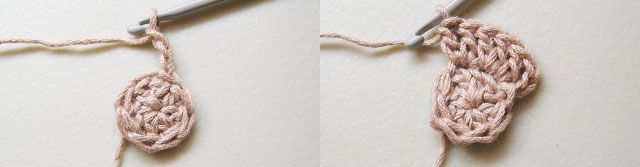
1) To begin chain 2. Then, in row 1, chain 1 and make single crochet stitches in the second chain from hook. This start, besides being fast and practical, leaves a small hoop. This is a great choice for beginning hats, amigurumis, bags and flowers.

2) To start make a magic circle. Then, in row 1 chain 1 and make single crochet stitches inside the ring. Pull the yarn and close the ring into a tight almost invisible hoop. This beginning is also suitable for taller stitches, after making the magic circle, chain 2 (for half double crochet) or chain 3 (for double crochet) to start row 1 and and continue with the stitches. This is a great choice for beginning hats, amigurumis, bags and flowers. The advantage of pulling the beginning strand is that the ring will be completely closed and almost invisible.


3) To begin make a small number of chains. Close them into a ring by making a slip stitch in the first chain made. Be careful not to twist your chains. Then, in row 1 chain 1 and make the single crochet stitches inside the ring. This beginning is also suitable for taller stitches, after closing the chains into a loop, chain 2 (for half double crochet) or chain 3 (for double crochet) to start row 1 and continue with the stitches. This is a great choice for beginning flowers.

4) Maybe you won’t start with a circular shape but more of an oval, square or a more elongated base. You are given a number of chains to begin with. Then, in row 1, starting in second chain from hook, make single crochets in the base chains, then, in the same row go to the other side of the chains and continue making single crochets following a round pattern. This beginning is also suitable for taller stitches, make the chains to begin. Then in row 1, if you are working with half double crochets, start in third chain from hook and make your stitches. And if you are working with double crochets, start in fourth chain from hook and make your stitches crocheting both side of the chains. This is a great choice for making bases, covers, cases and bags.
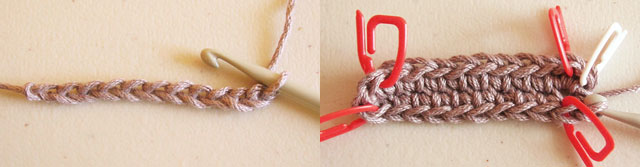
5) You can be given a longer number of chains to start. Close them into a ring by making a slip stitch in the first chain made. Be careful not to twist your chains. Then, in row 1 chain 1 and make single crochets in the base chains. You could also just make the chains and close them into a loop by making the first single crochet of row 1 right away. Both ways to start are correct. This beginning is also suitable for taller stitches, after closing the chains into a loop with slip stitch, chain 2 (for half double crochet) or chain 3 (for double crochet) to start row 1 and continue with the stitches. This is a great choice for beginning straps, belts and cowls.

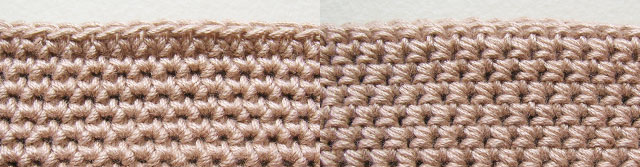
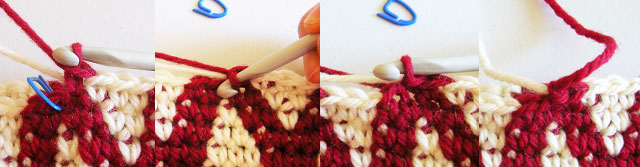
Regardless of the choice you make to begin your work in the round with single crochet, place a marker in the first stitch of row 1. This will make it easier for you to count stitches and know when to stop crocheting. To begin row 2, remove the marker, make a single crochet right in the stitch that had the marker (this was first stitch of row below) and relocate the marker in the stitch you just made, this is the first stitch of row 2 and you have now started working in a spiral way with single crochet.
Every following row (or also called rounds) will start in the first stitch of the row below. Relocate your marker in the first stitch of every following round to avoid getting lost.

When working with higher stitches like half double crochet or double crochet you will be working in closed rows. Two or three chains are made to begin every row and they count as the first stitch. Usually you don’t need a marker to locate the first stitch because it’s quite visible. Each row is closed in the round by making a slip stitch in the second or third chain at the top of the first stitch of the row.

Some important facts about working in the round are:
a) When working in the round we usually don’t turn our work and we only crochet on one side of the piece we are making.
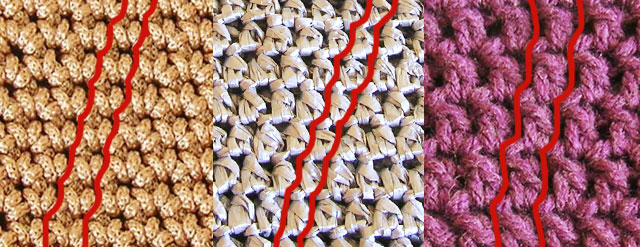
b) When we are working in the round stitches won’t line up straight, they will be moving over one side as we go working every row. They will move over to the right or left depending on which hand we crochet with.
c) The fact that you are working in the round doesn’t mean that you will only be making circular shapes, you can actually make any shape. Increasing and decreasing stitches in each row will allow you to give any form yo want to your work. When you increase stitches your work enlarges and widens for bigger size. When you stop increasing and work with a certain number of stitches for several rows, your work starts rising. And when you decrease stitches your work closes into a smaller hoop.

Finishing your work is quite simple, you only have to make a slip stitch in the first stitch of the row you are working on and fasten off (when working in the round with single crochet).
When working with taller stitches just make a slip stitch in the second or third chain at the top of the first stitch of the row as you usually do at the end of each row and fasten off.
As you can see, working in the round is mainly about deciding how to start based upon the final shape you want to make. It’s a basic yet broad technique which allows you to construct as many forms your imagination can think of. Hope this advice was useful.